This happened over a few days.


March 3, 2019

We decided to go with the “natural” Penofin color.

This happened over a few days.
We decided to go with the “natural” Penofin color.
Finished the layers of polyurethane coating for the bottom of the house.
Hey! We started looking at windows! It’s pretty exciting, but also revealing that we really did not consider the ramifications of the windows in the house plan. 1) Windows are expensive, especially when they need to be tempered glass because your house will be jostling down the highway. 2) Windows are really crap insulation (compared to solid walls). We have been working so hard to make the house well insulated, but we didn’t think about how many windows were in our design! Our big house that we live in now is 1500 square feet and has 12 windows. Our tiny house is 135 square feet and has 15 windows! The thing is mostly windows! Before we started building when we were evaluating the design, I was ALL about the windows because I was afraid the tiny house would be dark and feel like a cave without them. Now I’m cursing that we at least didn’t think about the other ramifications.
Well, we’re going to figure it out.
Here is a very exciting picture of how we actually spent most of the day, though: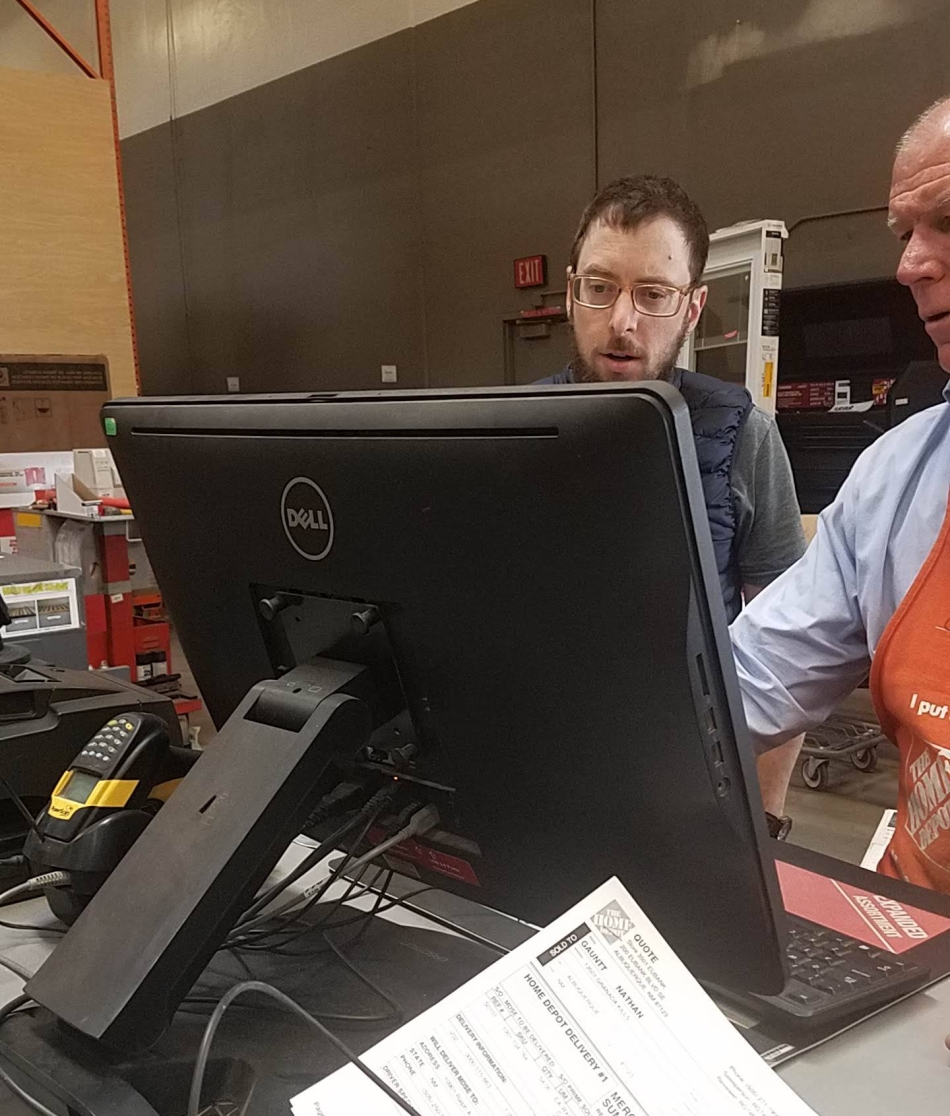 We are planning to put insulation outside the framing and inside the cedar siding. We’ve decided to go with rigid mineral wool. However, we live in the desert where literally no one does this. We have been trying to figure out how to order it.
Here is a very exciting account of how we maybe did:
Earlier in the week, Nate finally found a guy at the pro-desk of the big box hardware store who was able to track the product down and who said they could special order it for us. Nate did a little more research on exactly what and how much we needed, and we went together to place the order. Pro-desk guy was at lunch, so regular pickup order guy tried to help us. He finally got us a quote, but the units of the material were looking weird and the price was SUPER high, so we thanked him and walked away with the quote. By that time, pro-desk guy was back, so we took the quote to him (different guy than Nate had talked to). He spent about 25 minutes being utterly confounded because he couldn’t find the inventory number in the system. Finally he let Nate come behind the desk and prompt him with some search words and they eventually found the product. The stuff is 2’x4′ boards 3″ thick. It is sold in packs of 6, which for special orders, come in pallets of 18 boards. Pickup desk guy had ordered us 54, should have been boards, was actually packs of 6! Pro-desk guy commented that it would have been enough to insulate a hotel! Thank goodness we toughed it out and made it to the end of our *knock on wood* correct order of 3 pallets, which should come out to 54 boards. I guess we’ll see what comes when they deliver. After the snafu with the metal roof, I’m not holding my breath.
Anyway, we came home and met Tom who helped us work on sealing the bottom of the house. I said the bottom of the house, Tom!
 Better.
 Aye, she’ll be in ship shape in no time!
We have a neighbor who offered us FREE flooring!  Man, we were excited to pick that up! We would like to do more reused materials, but let’s face it, we really struggle with the planning and purchasing of new materials. We are just not organized to seek out 2nd hand stuff most of the time. It has been really cool seeing the interest in our crazy project from the neighborhood. The only thing our floor donor wanted in return was to see our house when it’s finished! Such a fair price.
We did the 2nd coat of polyurethane sealing this day, too. Nate complained at me for how much I was dripping on the bottom of the trailer, until he tried to do it. The underside is real awkward.
You may be wondering, “But what about the roof? Why didn’t you work on finishing that?” Well, we gave some roofing pieces to a friend who offered to weld us a transition piece for the ridge cap. You don’t rush someone who offers to do some free welding for you! So we’re still waiting on that.
But first, some shenanigans at the hard ware store, because we’re starting to think about what’s next after the roof is finished.
Nate at the hardware store: “Hmmm. Is that a reasonable price for treated lumber? Will this meet our needs?” Megan at the hardware store:
 Nate at the hardware store: “We’ll need stainless or coated screws for the cedar siding… they’ll need to be longer than the insulation and the furring strips… hmmmmm…”
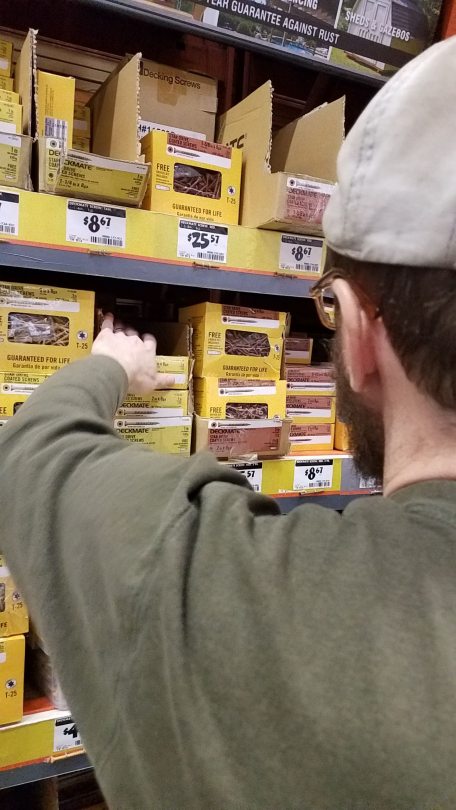 Megan at the hardware store: “Just looking for a good screw. Heh heh heh”
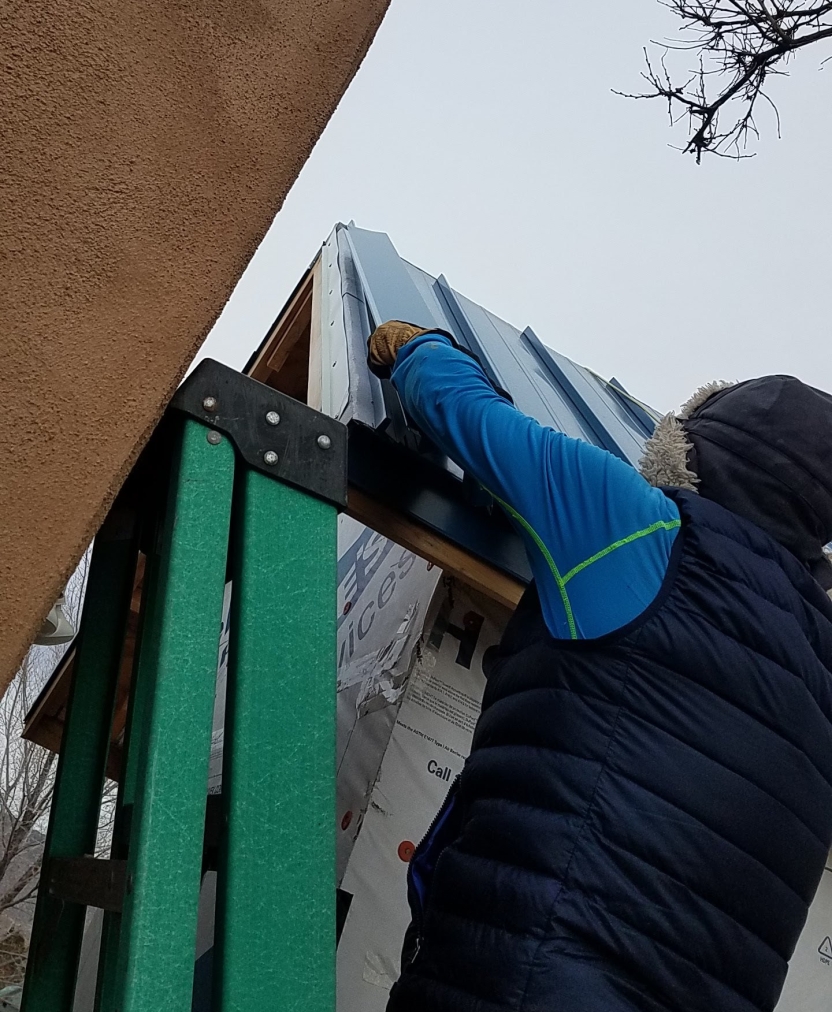
BACK ON THE ROOF. ACK. GAH! BLECCCCH! UGH! It felt to me like we were struggling for each inch. At least we can stand up on the dormer part of the roof. That made all these little clips vastly easier. The clips are the little white things by my knee to the left in the above picture. The ridge cap (at the right) clip on top of them.
Nate was working on the transition, which turned out to be much nastier than we thought.


It’s nasty because there’s supposed to be 3 inches of overlap whenever you have two roof pieces come together, but it’s looking like it’s impossible to fold the top piece so there are no gaps. There’s nothing under these pieces, no flashing, no ice and water membrane – the ridge is just open to the wooden ridge beam below, so gaps are a big problem. The metal roofing guys sold us this wacky complicated ridge cap because we have two different ridge pitches, but in all my hours of internet searching, I can’t figure out how that’s suppose to help.
We have two very long pieces of ridge cap at the front and back of the house, and then this transition piece between them going from the steep to the shallow roof pitch. Unfortunately, we can’t install the other long piece until the transition is done, because you have to consider the direction of wind and rain flowing when you’re towing the house, so we always have to work from license plate to hitch. WE ARE S0O0O CLOSE TO JUST HAVING A ROOF. It is like a little 3 foot wacky piece holding us up! UGH so frustrating!!
With the rake trim FINALLY on, we were ready to start the last part of the roof installation: the ridge cap. OMG. This was actually the end of the roofing! I can’t even write how ready I was to just have a roof already!


Above: test piece and actual piece.
 You can’t really see it from this picture, but there’s an awkward inch or two height difference between the gable/steep part of the roof and the dormer/shallow part of the roof. Nate has exploded the ridge cap join to try to figure out how to make that transition over the height difference.
 We also had bought a bunch of ridge cap vent material clips, but when we got ready to put them in, we discovered they weren’t right for our roof, which is why Nate was making one MILLION little clips. Good thing those guys at the metal store sold us WAAAAAY too much z-trim that we could use for this purpose.

We also discovered the vent material (spongy stuff that passes air through and repels water) wasn’t right. Guys, buying the right crap to build a roof is the hardest part of this tiny house project so far! UGH.

There was some more sticky stuff involved in getting the ridge vent attached. Every time you attach a metal piece to a metal piece, you put a layer of tacky tape to seal the boundary.


Above, Nate was scooting across the house, squeezing his thighs to keep from slipping off. He was really sore on the 2nd day of using this version of a thigh master all day. Poor Nate!

Thankfully, we had some visitors to cheer us up! Nate’s brother and family were visiting. We were so excited to share our progress with them! The girls were pretty impressed.
While Sarah and our nieces went to visit great-Grandma, we put Bryan to work.


 Bryan said I was looking like a real roofer. I’ll take that as a compliment!
 Above is a view of the transition. The bottom ridge cap piece wasn’t installed yet, just sitting in place.

 The best part was actually having half the roof complete! Once those rivets went on, that part of the roof was officially done – water-tight and ready to keep us dry! Holy cow, such a relief!
And we got a nice sunset to finish out the day!

Dealing with the overlapping layers of rake trim on the butterfly end of the roof was a bit of a pain. The lower layer needed to go behind the upper layer, but the fascia the trim attaches to wasn’t quite aligned that way. Plus, we needed to max out our extendy ladder to reach up there.


I spent some part of the day inside because I was feeling really frustrated with this trim and having a hard time with life in general. Blerg.
We were close to finally attaching that last rake trim. It was kind of a long climb up there.


 I wish I could feel a little bit more joy reflecting on this being finished, but mostly I’m just irritated that it took so long!! Oh, how I long for a completed roof!
Just Nate making one million little attachments for the final roof piece, which will be the ridge cap.

Happy New Year, Tiny House!

We have been having some weather! Quite a setback for our poor tiny roof.
All rake trim, all day! 


Cleats and z-trims were already in place. That left cutting and folding and manhandling the rake trims.


 Almost there!
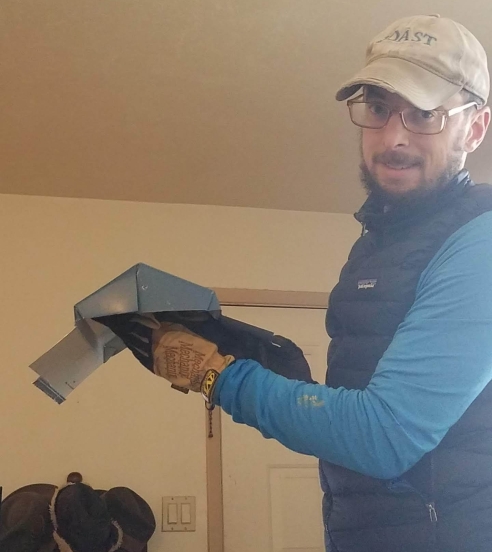
We started the year off by donating a trunk load of stuff.
 This is something we just do now. We have a spot in our big house that we collect unwanted items and every couple of weeks (or months) we donate it. This batch included the last desktop computer we had in the house and a hand crank sausage grinder & stuffer.
It’s kind of amazing how much stuff we still have, despite how hard we try not to accumulate new stuff and and how hard we work at reducing our stuff.
I started this blog by writing about my uneasy relationship with my stuff.. But since then, I’ve spent a bunch of time working on my stuff situation and a bunch of time thinking and reading about minimalism. What even is minimalism, other than a buzzword?
I read he Life Changing Magic of Tidying Up, by Marie Kondo of recent Netflix craze- Tidying Up With Marie Kondo. For her, minimalism focuses on discarding – one should discard every object, unless that object “Sparks Joy.” From this book, I learned that it’s good to take the low hanging fruit of minimalism first, thus building your minimalizing muscles. Start with Clothes, next work on Books. Do not tackle sentimental items first! I think it’s good to actually respond with your emotions to the objects you own – to detect whether the item “Sparks Joy.” I also like her method of gathering everything of one category from your whole house to sort through at once. Staring at 3 foot deep drifts of clothing covering your bedroom floor, it’s obvious you don’t need that many clothes!
I find her method to be really exhausting, though. I made it through the clothing, but it was difficult. My minimalising muscles were weak. I was not good at detecting that spark of joy. I was much better at rationalizing keeping everything. I needed quite a bit of recovery time, more than a year, before I was ready to tackle the next category: books. If I set out to follow her method and go through the whole house at once, I’d never make it. I also got turned off by her fussy and intensive need for tidiness, especially folding every item of clothing in a strange new way. But, I did take away her golden rule: “Does it spark joy?”
I also read Goodbye Things: The New Japanese Minimalism, by Fumio Sasaki. I really liked the personal story of the author woven in this book. Marie Kondo starts her book by saying that she’s always loved organizing and tidying. Holy cow, I do NOT relate to that. Fumio Sasaki talks about having a hallway so cluttered with bookshelves and stacks of books that he wondered if he would actually be killed by his own processions in an earthquake. THAT I can relate to!
Sasaki comes to realize that he collected so many books because he wanted to think of himself as the sort of person who read intellectual books, not because he read them or liked reading them. When he realized that, he could start to give them away. Once he started giving things away, he was able to recognize the psychic toll all his belongings were extracting from him. He described it as mental energy spent to catalog all the stuff, remember where each thing belongs, where it might currently be, and remember whether it needs cleaning, repair, or replacing. But it’s also all the mental energy you have invested in the memories or ideas tied up in those objects. A stack of language books might have started out as an ambition, but turned into a failure, and now causes a ping of guilt or shame when you see it, and reminds you of another to-do list item for “someday.”
His advice, hard won through his own experience, includes some 50 minimalism mantras interspersed with little stories of how he figured them out and used them in his own life. Two that I found really helpful were “Let go of the idea of someday,” and “Let go of who you used to be.” I wish I had those ideas when I worked my clothes. I can reflect now that my ideas about someday or who I used to be were causing major interference when I tried to tell whether something sparked joy. I liked that Sasaki had many different suggestions, something for everyone and something for different kinds of objects. I really liked his mix of practical advice, philosophy about owning things, and almost psychological perspective about thinking about your relationship to your things. I also felt more at home with his goal of minimalizing, which I sum up as: “Everything you own should add to your life. Let go of everything that doesn’t”.
I’ve also followed The Minimalists from time to time. One post that really stuck out at me was by Joshua Millburn about going through his mother’s things when she died. I highly recommend it: https://www.rowdykittens.com/2011/03/sentimental-items/
He was trying to pack up and store all of his mom’s stuff when he found sealed boxes of his childhood memorabilia under her bed. The boxes hadn’t been opened in 25 years. He writes, “And yet Mom had held on to these things because she was trying to hold on to pieces of me, to pieces of the past, much like I was attempting to hold on to pieces of her and her past.”
I realized I’ve been doing this ever since I was a small child. I kept all my own school papers, perhaps out of fear that I’d lose the knowledge they contained if I threw them away. I kept every gift that was ever given me, even after I grew out of them. Some were given to me by people I hardly knew, or given so long ago I couldn’t remember where they came from. But I think even as a little kid, I felt these objects were me, somehow. If I got rid of any of them, I would stop being who I was.
One of the points Millburn makes in his blog post is that his mom hadn’t opened her boxes of memories; she didn’t need them to remember and love her son. “Our memories are not under our beds. Memories are within us, not within our things.” This is something that Sasaki talks about learning, too.
I think this is the lesson I’m slowly, viscerally, learning in my own minimalism process. When I gave away the sweater my grandma gave me, I didn’t stop being able to feel how much she loved me (though I was afraid that would happen). Millburn says he learned, “I am not my stuff. We are more than our possessions.”

You might not believe me when I describe the psychic toll of things. Sasaki describes it as all the objects silently vying for your attention. Millburn says, “Holding on to stuff weighs on us mentally and emotionally. Letting go is freeing.” I’m finding that I agree with that. As I give more stuff away, I am starting to notice a shift. I can open my closet and just get a shirt that makes me happy, instead of feeling judged by the shirt my mom picked out for me a million years ago. And it’s little things, like finding the garlic press right away because the junk drawer only has things we use all the time, now.
It’s not just about getting rid of things you don’t want. The other side of the coin is that everything you own could be something you really love. Sasaki says, “If it’s not a HELL YES! it’s a no.” What if every object in your home made you feel HELL YES!?
It has taken me quite a while to feel ready to give away any of my parents’ processions*. We had bags of my dad’s clothes in piles in our spare room for months. I still have an assorted box of things from my mom’s apartment, including her purse. Every time I select an item that belonged to them to give away, I face my fear that giving away their things will diminish my memory of them. It. Is. Hard. This is the heavy lifting of minimalism. But after all my work, I’m finding that I can hold something that belonged to my mom in my hand and recognize that it doesn’t spark joy. And I can let it go. And I’m finding that doing so really feels like releasing a weight I didn’t realize I was carrying. I’m also finding that I can take something of my dad’s out of a box and hold it, and find that it does spark joy. Knowing this, I can find it a little place in my house where I see it and feel joy when I see it, and that’s much nicer than having it buried deep in a box deep in a closet.
And that’s really my goal: to pare down so that the objects that I have are meaningful to me. So that each object taking my mental energy is also reflecting joy or serving a useful purpose. I feel eager to see what living in such a space feels like, someday – but that’s the good kind of someday! I also just wanted to write about the experience of minimalizing, since most often, you see the social media “After” picture.
What it looked like with all the intermediate pieces, but no trim:


We keep trying to estimate how many more workdays we need to get all the trim finished so we can secure the ridge cap, and for the last month the estimate has been about 2 solid days. This trim takes FOR-EV-ER.
It was cold again, so I needed a power-up. Chocolate: the behind the scenes silent partner that keeps this tiny house project going.
Nate’s silent partner is beer, cheap beer, so he can buy it in a case
… because if it’s whisky, the day ends earlier.
To make the rake edge fold:


Getting ready for the peak piece, or is it an upvote? You decide.
I was at the back of the house, working on more cleats and z-trims.

Here I was, talking myself into “We Can Do It” I often reflect that those women in WWII had never run a lathe or used a riveter, but they learned, and they did it! They did it despite people telling them that they couldn’t, or shouldn’t. It seems so out of fashion in this modern age to try to do something you have no idea how to do, but it feels pretty good. I recommend it! Keep in mind that even the experts you see on YouTube were beginners once, learning something new. In fact, our experience has been that you go looking for experts on YouTube, and you might find instead a someone who clearly has no idea what they’re doing!! However, I would advise you to try something a little smaller scale than a whole house, at least for your first We Can Do It project.

Measured twice, but actually a bit too short once in place


I had an orchestra concert this day, but before I left, I came up and tried to help Nate get the peak piece on.

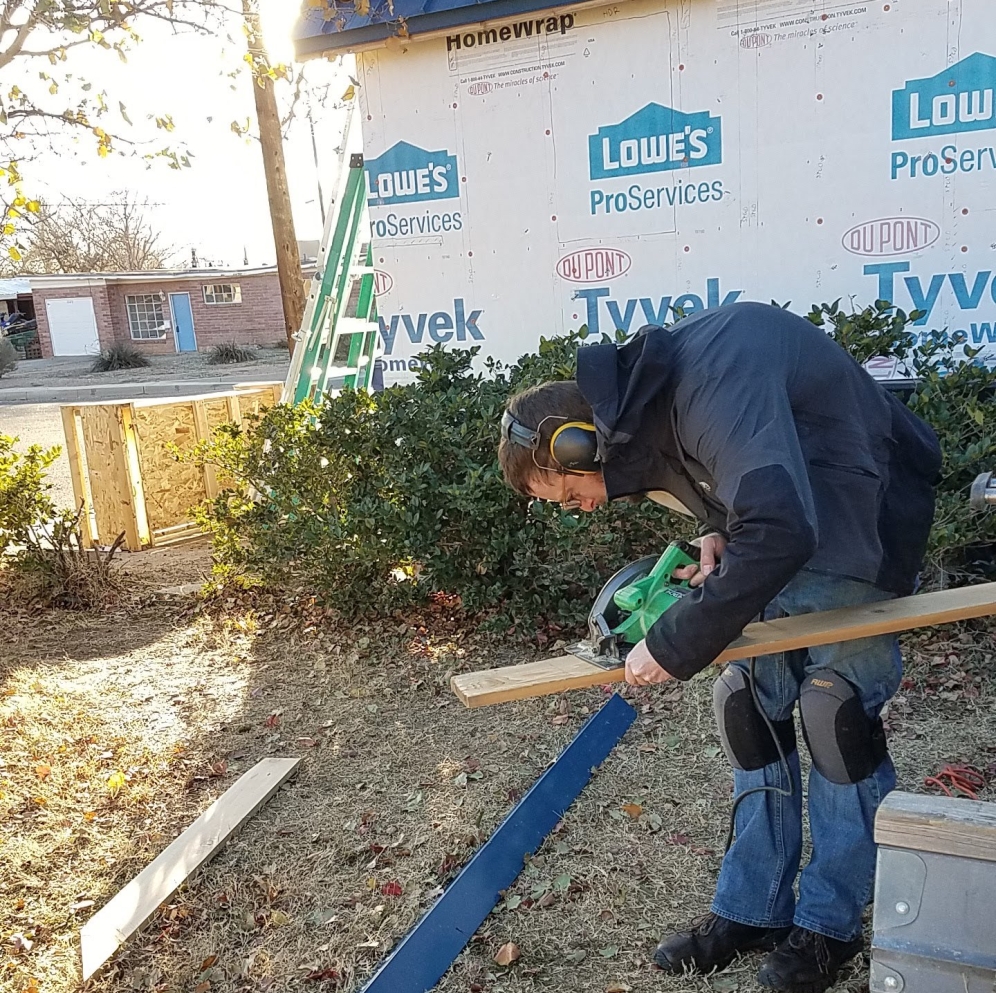
Time to finish up the fascia, now that all the panels and lower trim pieces are on. In the picture below, Nate was lining up a piece to mark for a cut. It was kind of nice to get the saw out again!
Here I was, applying glue and going for the “Most Awkward” photo award at the same time:

Without fasica:

Fascia screwed in tight and sealed up with the water barrier:

For some reason, this piece of wood had a bunch of dried glue that I had to scrape off. Sometimes you imagine the things you need to get done on a project, and then you spend a bunch of time doing something you really did not anticipate.

Nate’s saw skillz: l33t
 Well, this piece is going behind another piece, so it won’t show…

 Right one done, left one not. Not easy to photograph:
Inclement weather, so we started indoors. This is our favorite Canadian roofer, Dave Mackey.
  We have watched hours of his how-to videos from American Building Components. Yeah, I know it has “American” right in the title, but you listen to this guy talk for 3 seconds and you KNOW he’s Canadian. We were watching the video about how to do rake trim. We both kind of have a builder’s crush on him. That’s a thing, right? When you’re learning to build, and you see someone who makes it look so easy… so you watch every video they make and try to learn everything you can from them. That’s what I call a builder’s crush.
We went outside later, to discover that the trim pieces poor Nate had picked up were wrong AGAIN. GAH!  Wrong size: about 1/2 too short. Wrong color, AGAIN. The bottom piece is what we want.

We felt pretty cursed. Why we can’t get the right pieces? I have no idea. We just can’t!
After some cursing, maybe a few tears, and some serious pouting on my part, we laid out all the pieces we had and decided to just use the short, wrong colored pieces for the shallow angle roof and use the correct stuff for the steep roof. WRONG PIECES BE DAMNED!

Step one, according to Dave Mackey, is to place the trim with its cleat and mark on the fascia where the cleat needs to go. Cleat gets attached to the fascia, and the trim piece fits onto the cleat really tightly. Above, Nate has the cleat in place. Next, you place and attach the z-trim, attached on top of the roof, which the trim fits onto really tight and which has the rivets. So the top of the rake trim fits on the z-trim on the top of the roof, and the bottom of the rake trim fits on the cleat on the fascia. Next, cut and fold the trim, which we kind of had to make up (shown below). Next, put on all the sealant and putty tape to seal everything up and put it all together. This step involves what Nate calls MAN STRENGTH. Finally, rivet the top of the trim to the z-trim attached to the top of the roof. Easy, right? In practice, add in 3 or 4 or 5 more iterations where you place the stuff and mark it, cut or fold it, test fit, and repeat.

This is why we start on the B-side, now. So we can do the 2nd one better on the A-side. Marking for A-side:
 The B side looks alright from the front
I don’t have quite as much patience for the finesse cutting/folding stuff.

I can do the cleat & z-trim attachment that doesn’t require much finesse or patience, though…
Here’s an extreme angle view of what I was doing.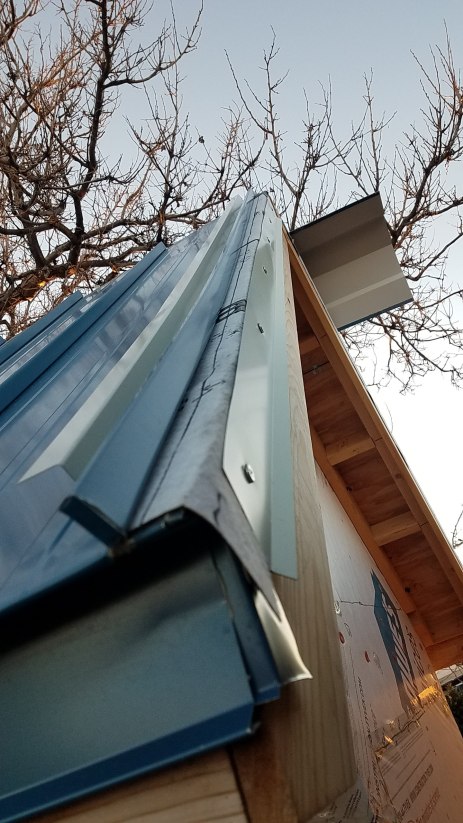 Here’s Nate with his almost finished piece
 Can you tell it’s a different color than the main part of the roof? Just say “no,” so I feel better about it.
